
Table of Contents
In this first tutorial part, we are going to write a program that reads a PE file, parse its headers and maps its sections in memory.
Basic main program
As an example, we will be using the 32 bits version of calc.exe, located here: C:\Windows\SysWOW64\calc.exe (yes, the 32bits binaries are in SysWOW64, not System32, I know …)
Let’s jump right in: we’re going to read a file and put all its content in memory.
#include <stdio.h>
#include <stdlib.h>

// loads a PE in memory, returns the entry point address
void* load_PE (char* PE_data);

int main(int argc, char** argv) {
    if(argc<2) {
        printf("missing path argument\n");
        return 1;
    }

    FILE* exe_file = fopen(argv[1], "rb");
    if(!exe_file) {
        printf("error opening file\n");
        return 1;
    }

    // Get file size: put pointer at the end
    fseek(exe_file, 0L, SEEK_END);
    // and read its position
    long int file_size = ftell(exe_file);
    // put the pointer back at the beginning
    fseek(exe_file, 0L, SEEK_SET);

    //allocate memory and read the whole file
    char* exe_file_data = malloc(file_size+1);

    //read whole file
    size_t n_read = fread(exe_file_data, 1, file_size, exe_file);
    if(n_read != file_size) {
        printf("reading error (%d)\n", n_read);
        return 1;
    }

    // load the PE in memory
    printf("[+] Loading PE file\n");
    void* start_address = load_PE(exe_file_data);
    if(start_address) {
        // call its entry point
        ((void (*)(void)) start_address)();
    }
    return 0;
}

void* load_PE (char* PE_data) {
    //TODO
    return NULL;
}
Nothing fancy here, we can compile it with: mingw32-gcc.exe main.c -o loader.exe, run loader.exe C:\Windwos\SysWow64\calc.exe, and see our [+] Loading PE file.
Note the “tips” at the end: to call an arbitrary address, we casted the void* into a function pointer, before calling the pointer.
Now the whole point is going to be programing the load_PE function.
Precisions about addresses
Before jumping into the PE headers, let’s talk about adresses. We’re going to use 3 “types” of addresses:
- Raw addresses (or “file offset”): it’s an offset in the PE file. A raw address of 0x23 will mean the byte number 0x23 in the file. That would be
PE_data[0x23]. - Virtual Addresses (VA): addresses in the RAM. That’s the one you get if you print a pointer value.
- Relative Virtual Addresses (RVA): it is the address relative to the “ImageBase”, the addresse where the PE is loaded.
The conversion between VA and RVA is trivial (just add or remove the ImageBase). To convert to the Raw address, you have to look at the sections, we’ll see that below.
The DOS header
Every executable file in Windows is in a format called PE, for “Portable Executable”. That include “.exe”, but also “.dll” files.
Let’s take a first look at how a PE file is made. Open calc.exe with CFF explorer (you sould have an explorer right click option):
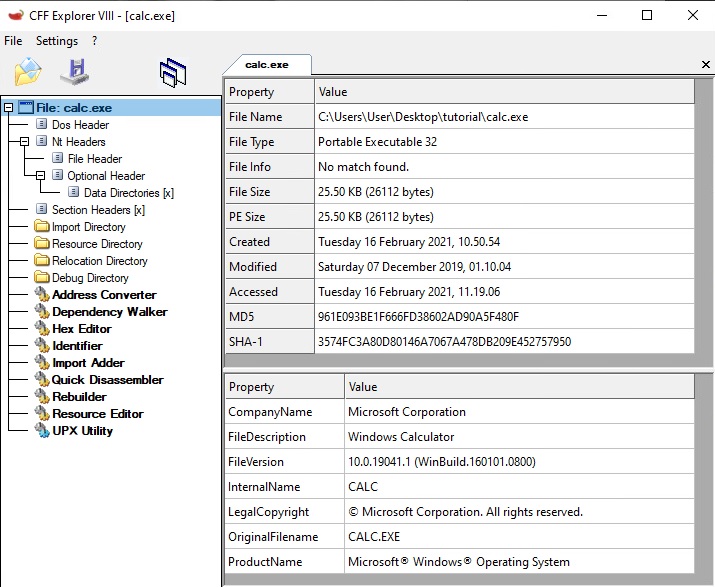
On the first screen, you’ll see a summary of information regarding this file. You can check the file type is “Portable Executable 32”, which means 32 bits.
Let’s go see the DOS header:
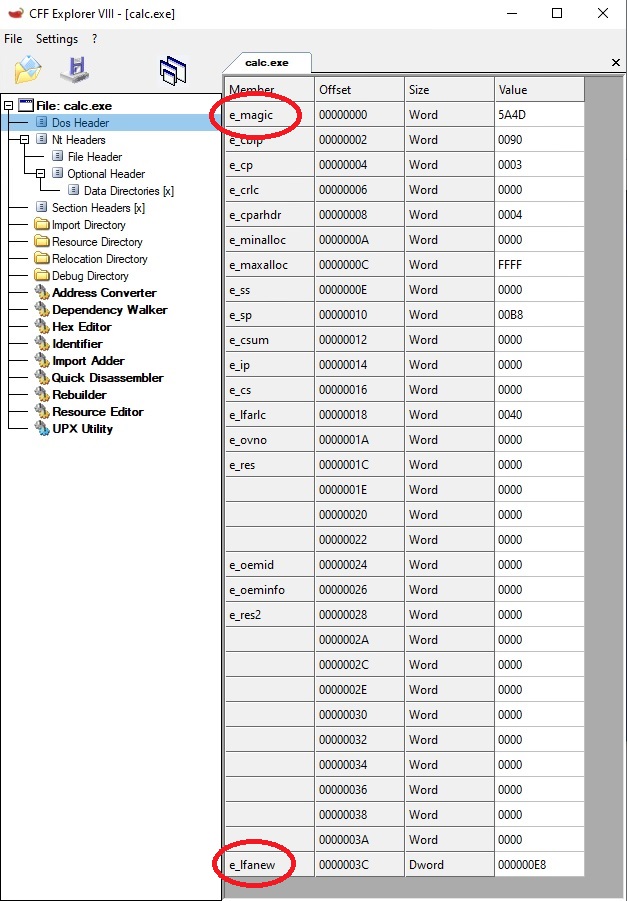
Evry PE file starts with a DOS header, and the signature, the 2 firsts bytes, is always the same: “MZ” (0x5A4D). The rest of the fields are pretty much useless, we’re only going to use e_lfanew which is the Raw address of the next header, the NT header.
Note: The column “Offset” is present is all the screens of CFF Explorer, and is what we called the “Raw address” earlier. Can be usefull for debugging.
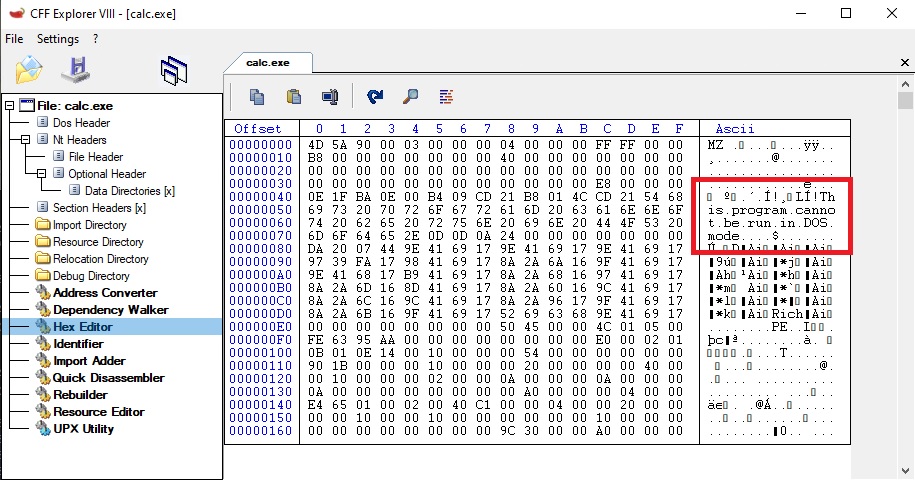
In case you’re wondering what is between the e_lfanew field (at Raw_0x3C) et the NT header (at Raw_0xE8), it’s the DOS stub (“This program cannot run in DOS mode”), you can go check it out with the Hex Editor:
So, let’s start our loader. Those headers have structures already defined inside winnt.h, which you should keep around. We’re also importing windows.h, which comes with all the standard windows functions we’re going to use later.
#include <winnt.h>
#include <windows.h>
For the sake of simplicity, we’re not going to check the signatures, considering we trust ourselves to not pack something that isn’t a PE32 with our PE32 packer. The DOS header parsing is quite trivial:
IMAGE_DOS_HEADER* p_DOS_HDR  = (IMAGE_DOS_HEADER*) PE_data;
IMAGE_NT_HEADERS* p_NT_HDR = (IMAGE_NT_HEADERS*) (((char*) p_DOS_HDR) + p_DOS_HDR->e_lfanew);
Note: We’re manipulating pointers, so be very, very carefull with pointer arithmetic: pointer + 1 actually adds size_of(type of the pointer), hence the cast in char*. Easy mistake to make here!
The NT Headers
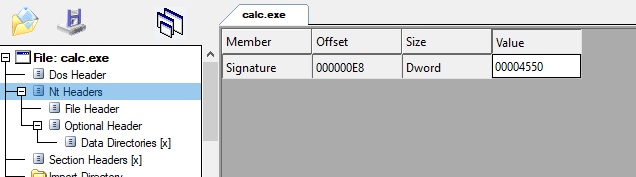
This “NT Headers” we now have actually is a simple signature (“PE”), with 2 other headers inside. We can see the signature in CFF:
Right after this header (or inside from the C structures point of view) is the “File Header”:
Here we have essential informations:
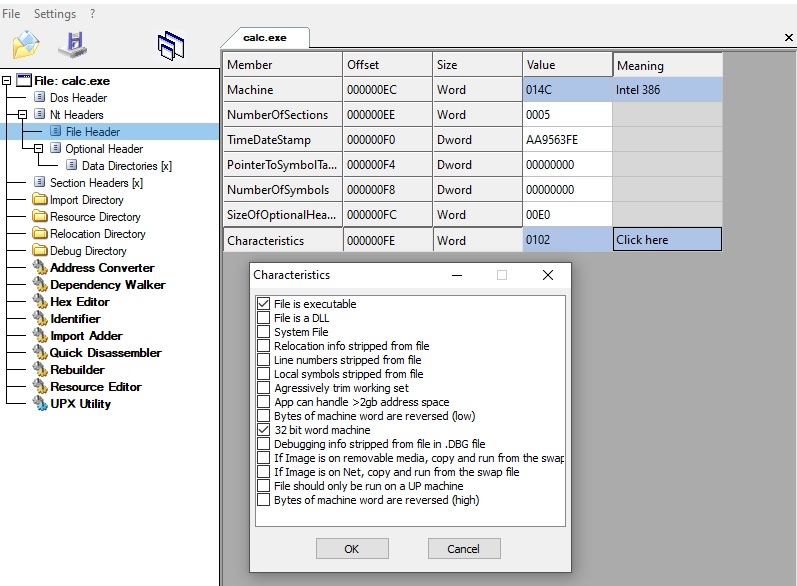
NumberOfSectons: the … well … number of sections. We’ll see about those later, but keep that in mind!Characteristics: a flag field, which you can edit with those checkboxes. See the checkbox “File is a DLL” most notably. DLL are actually PE files also, and this is the only way to make the difference.
And right after this File header, we have the “Optional Header” (and it is actually mandatory, not jocking here):
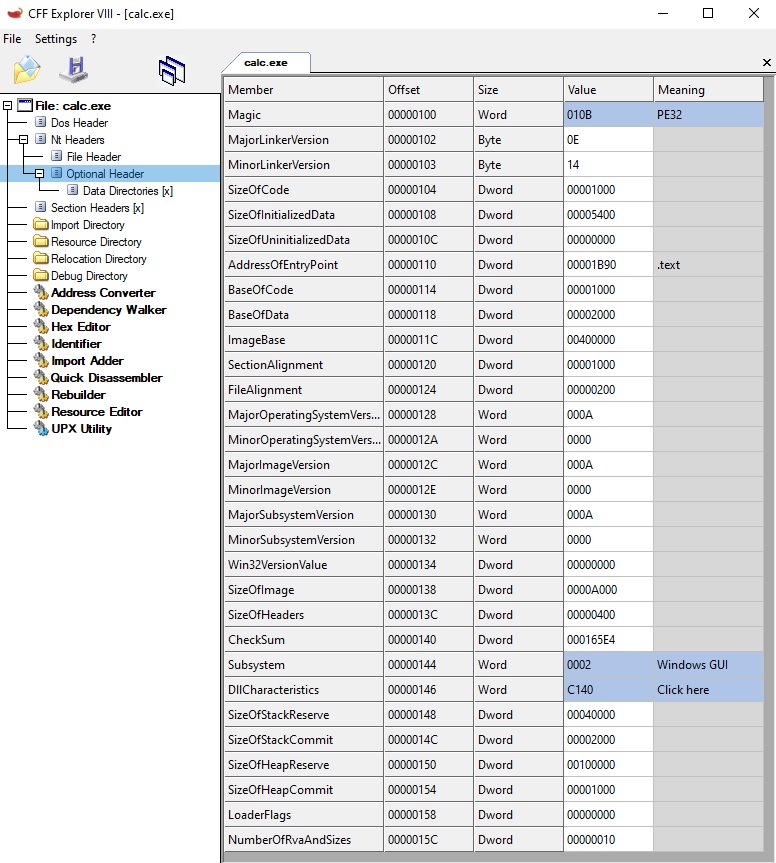
There’s A LOT of information here, but most of it is not actually used, or always the same. The essential points are:
Magic: another signature. It makes the difference between PE32 and PE64 binaries.AddressOfEntryPoint: the RVA of the first instruction to run after loading the binary. So that’s where we’re going to jump once everything is set. (Relative address, mind it! Everything now is going to be relative anyway)ImageBase: where the binary prefers to be loaded. Everything (all the RVA) is calculated compared to this value.SizeOfimage: the Virtual Size of the module once loaded in memory. That’s how much memory we need to allocate to load it.SizeofHeaders: the total size of all the headers.DLLCharacteristics: other bunch of flags, the most usefull is “Dll can move”, which tells if a module is ASLR enabled or not (it can move or not).
And right after all this are the “Data Directories”, we’re going to skip then for the moment, we’ll come back to it later. Let’s put all this in action ! Here is the structure for the “NT Headers” in winnt.h:
typedef struct _IMAGE_NT_HEADERS
{ DWORD             Signature;
  IMAGE_FILE_HEADER     FileHeader;
  IMAGE_OPTIONAL_HEADER32   OptionalHeader;
} IMAGE_NT_HEADERS32, *PIMAGE_NT_HEADERS32;
As you can see, no pointers there: the headers are inside one another, meaning we already have everything set up. Let’s extract a few informations:
DWORD hdr_image_base = p_NT_HDR->OptionalHeader.ImageBase;
DWORD size_of_image = p_NT_HDR->OptionalHeader.SizeOfImage;
DWORD entry_point_RVA = p_NT_HDR->OptionalHeader.AddressOfEntryPoint;
DWORD size_of_headers = p_NT_HDR->OptionalHeader.SizeOfHeaders;
That’s pretty much all the fields we’re going to need.
We have the size of the image in memory, let’s allocate it. For now, we’re going to only consider loading binaries that have ASLR enabled, so we can allocate memory anywhere, it will not cause any issue.
char* ImageBase = (char*) VirtualAlloc(NULL, size_of_image, MEM_RESERVE | MEM_COMMIT, PAGE_READWRITE);
    if(ImageBase == NULL) {
        // Allocation failed
        return NULL;
    }
We allocate size_of_image bytes in memory, anywhere, and that will be our ImageBase. We’ll be loading the PE at this address, which is not the same as the header’s “ImageBase”, that’s what ASLR is all about.
Then, we are going to start loading our PE content in memory. The first thing we can do right now it copy its header. The PE header is always copied at the ImageBase or every module in memory, so let’s have it:
memcpy(ImageBase, PE_data, size_of_headers);
So for now we have the memory, we copied the header, but no actual code has been loaded, and that’s what we’re going for now: sections.
Loading the sections
The PE binary, and memory once loaded, is divided in parts called section. Let’s take a look at the header (which is right after the previous one):
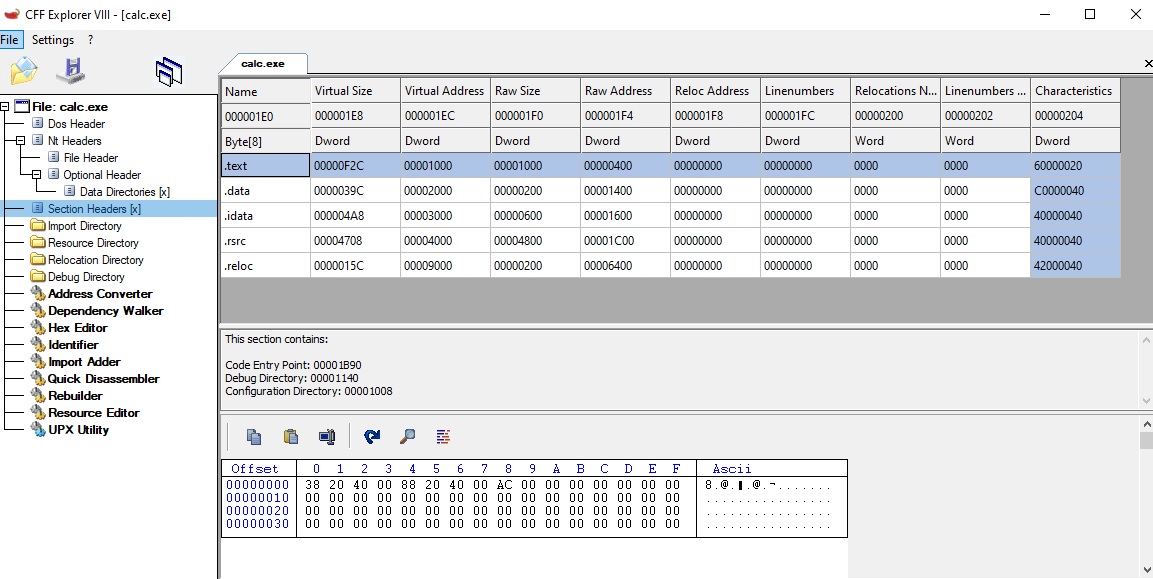
We have here 5 sections, each with:
Name:.textgenerally used for the code,.datafor global variables, etc … 8 bytes maximum, optional (can be empty, ie all zeroes).VirtualSize: the size it occupies in memoryVirtualAddress: the RVA it has to be loaded to.RawSize: the size of the section data in the PE fileRawAddress: the offset of the beginning of the data in the PE file- a few field of zeroes
Characteristics: the permissions of the section. Notice the.textis executable, and non-writable for example.
Note that VirtualSize and Raw size can be very different. A greater Virtual size means there are unintialized data put in memory. There could be a section with no RawSize, that would create a memory space with zeroes inside. And a greater RawSize is simply a matter of padding (padding size defined in the field OptionalHeader.FileAlignment, 0x200 commonly).
We can now copy our PE file content in memory, at the right places:
// Section headers starts right after the IMAGE_NT_HEADERS struct, so we do some pointer arithmetic-fu here.
IMAGE_SECTION_HEADER* sections = (IMAGE_SECTION_HEADER*) (p_NT_HDR + 1);

// For each sections
for(int i=0; i<p_NT_HDR->FileHeader.NumberOfSections; ++i) {
    // calculate the VA we need to copy the content, from the RVA
    // section[i].VirtualAddress is a RVA, mind it
    char* dest = ImageBase + sections[i].VirtualAddress;

    // check if there is Raw data to copy
    if(sections[i].SizeOfRawData > 0) {
        // We copy SizeOfRaw data bytes, from the offset PointertoRawData in the file
        memcpy(dest, PE_data + sections[i].PointerToRawData, sections[i].SizeOfRawData);
    } else {
        memset(dest, 0, sections[i].Misc.VirtualSize);
    }
}
And there we are. All the sections are loaded in memory. Everything is allocated. We also understand now how to convert from Raw Addresses to Relative Virtual Addresses (and the other way around): we need to look at the section table to match them. CFF has a very usefull “Address Converter” menu on the left which I’ll just let you check out.
If you noticed, all the sections are read/write, so no execute yet. We can see to it, and set their permissions to match the ones described in the section header:
//Set permission for the PE hader to read only
DWORD oldProtect;
VirtualProtect(ImageBase, p_NT_HDR->OptionalHeader.SizeOfHeaders, PAGE_READONLY, &oldProtect);

for(int i=0; i<p_NT_HDR->FileHeader.NumberOfSections; ++i) {
    char* dest = ImageBase + sections[i].VirtualAddress;
    DWORD s_perm = sections[i].Characteristics;
    DWORD v_perm = 0; //flags are not the same between virtal protect and the section header
    if(s_perm & IMAGE_SCN_MEM_EXECUTE) {
        v_perm = (s_perm & IMAGE_SCN_MEM_WRITE) ? PAGE_EXECUTE_READWRITE: PAGE_EXECUTE_READ;
    } else {
        v_perm = (s_perm & IMAGE_SCN_MEM_WRITE) ? PAGE_READWRITE: PAGE_READONLY;
    }
    VirtualProtect(dest, sections[i].Misc.VirtualSize, v_perm, &oldProtect);
}
And to finish, we can return the address (VA) of the entrypoint:
return (void*) (ImageBase + entry_point_RVA);
The final code can be found here : https://github.com/jeremybeaume/packer-tutorial/tree/master/part1
This may seem to work, but there are actually 2 very important steps we have yet to program: manage the imports, and handle relocations. But that’s for the next part of this tutorial : Part 2 : imports and relocations
Toutes les images sont http, elles ne se chargent pas dans Firefox
Hello, I love your tutorial.
However, I tried to execute your code but I obtain an error code -1073741819 which means ERROR_ACCESS_DENIED. After investigation, I found that this error is due to this line of code (the second time it’s called) : while (p_reloc->VirtualAddress)
I’m on Windows 11 and I compiled your project with default compilation options of Visual Studio 2022.
Please, do you have a solution to my problem ?
Hi,
I had the same problem and got it running by compiling it with target architecture x86. (Win10 VS2022)